Monday, December 13, 2010

Rainbow Fish

This project was done by myself and Leah Vilhauer. We started this off by presenting a power point and seeing if the students knew the difference between warm and cool colors. We had them take a plain sheet of paper and split the paper so that they had six boxes. Then we had them do some water color techniques to get them used to working with water colors. We had them do a flat wash, graduate wash, wet-in-wet, color resis, and water color crayons. After this was done, we had them choose either warm or cool colors to decorate their backgrounds for their fishes. Then if they chose warm colors for their background, they had to do their fish in cool colors. If they chose cool colors for their background then they had to do their fish in warm colors. They could use either water color crayons or water color paints. They had to choose two different elements and principles of design to use when decorating their background or fish. Then they had to also choose two different water color techniques they learned in this lesson. We had them glue their fishes to their backgrounds once they were dry. We used special water color paper for both the fish and the background because it's easy to work with and dries faster. Once they were finished with their projects, we had them self grade themselves using the rubric we are also going to use to grade their projects. We also had them answer four questions on the back about what warm and cool colors they chose, what elements they used, and what water color techniques they used in their projects. They answered these questions on the back of their rubric.

Monday, December 6, 2010

Painting and Printmaking


Project Summary:
This lesson was done by Kelly Davies and Halima Kringen. They started the lesson by having the class go around the table and reach our hand in paper bags and guess as to what was in the paper bag. Once we had all gotten a chance to feel what inside each bag, we gathered and had a class discussion has to what were in the bags. The teachers then presented a slide show on different textures and how we could use different textures in our projects. We were given different choices on what to use as our main drawing, I chose my name. We were given the primary colors along with black and white. We were allowed to use however many textures we wanted, but we had to use at least three. There were a lot of different texture choices to choose from, most of them were from the bags we had to guess on earlier. We were able to practice using the differentThen we had to use two primary colors, a secondary color, and an intermediate color in our porjects. My intermediate color was blue-green, which is what my name is written in. My primary colors were red and blue, and my secondary color was orange.
Activity:
An activity to go along with this project is an ice break to do towards the begining of school, where everyone is still trying to get to know each other. The students could then share what colors they used and why, and a fun fact about themselves. After everyone is done sharing, the students could put them on the bulletin board.

Oil Pastels- Snow Globes


Project Summary:
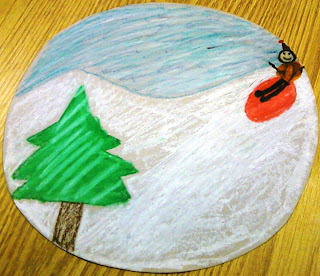
This lesson was done by Mandy Lee and Megan Gilbraith. The lesson began by introducing an artist from South Dakota, Terry Redlin, and some of his paintings. Terry Redlin used background, middle ground, and foreground in his paintings. After we were done learning about this new artist, we were given a practice sheet to practice drawing with oil pastels. I had never used oil pastels but the teachers were very helpful with giving us hints when working with them. When we were done practicing, we were given a stencil to use to trace out our snow globes. We then started to color using our oil pastels. We could draw whatever we liked, but we had to background, middle ground, and foreground in our picture. The teachers told us that it was easiest to start with the background, form the middle ground, and then do the foreground. There also had to be one item in the snow globe that represented us. My item was me sledding down the snow hill. After we were done coloring, we could cut out our snow globe. A few of us had the opportunity to share our snow globes with the class, while the rest of the class continued to work.
Activity:
This would be great to include in a lesson about the different seasons and how each one is different. The students could do a snow globe for their favorite season. Even though we're using a snow globe, it doesn't have to involve winter if it's not their favorite season. Then the students could share with the class what they included in their snow globe and why, and also why they chose that season.

Monochromatic Painting


Project Summary:
This lesson was done by Carrie Schlecht and Kassandra Ewalt. They started the lesson by giving us a choice of either a primary or secondary color and then white and black paint to go with our color of choice. Then the teachers showed us the different between tints and shades and what we had to do to our color to get a tint or a shade. We were given a practice sheet to work with when creating our tins and shades. Tints were created by adding different amounts of white to the organe and shades were created by adding different amounts of black to the organe. After we were done practicing, we were given a bigger sheet of white paper for our project. We were to pick a shape that we wanted to draw, such as square, rectangle, triangle, or diamond. Then we were told to draw as many shapes as we could but the shapes had to be overlapping. After this was done, we were to fill in our shapes with paint using tints and shades. We were to still have one shape filled with the starting color, which was orange, and then to have the other ones consist of shades and tints of orange. The last step was to outline the shapes with a black marker so that it made the shapes bolder.
Activity:
An activity to do with these paintings is a lesson on shapes with younger children, such as first graders. They can practice drawing shapes and then could possibly do about three or four shapes that are overlapping and have them use two different colors to fill in. Primary and secondary colors would be above their level, but it could still work for younger children when they are learning to draw their shapes.

Pinch Pots


Project Summary:
This lesson was taught by Shonda Dargatz and Clarissa Shafer. They started the lesson by introducing us to how pottery was used years ago. The one thing I remember was that it was used to hold grains and corn. We started with a block of clay and kept kneading it so that there wouldn't be any bubbles when we started making the pinch pot. The bubbles would create cracks and possibly make your pinch pot fall apart. Once we had all of the bubbles out the teachers came around and cut our clay in half to see if we had all of the bubbles out. Once they gave us the okay to start, we put our thumbs in the middle and pushed down and formed the edges as we pushed down the middle. Once we had our pinch pot molded, we had to make sure we got all of the cracks out. We could use some watery stuff to help get the cracks out of our pinch pots. After we were done getting the cracks out, we were to use at least two elements of design on our pinch pots. I used lines, patterns, and shapes in my pinch pot.
Activity:
An activity you could do with pinch pots is to have students look up research on pinch pots and see what they can come up with. Have them do a one page paper on the research they found. You could have them present their research to the class, or do a class discussion on what they found.

Starry Night Finger Painting


Project Summary:
This project was started by giving the class background information on Vincent Van Gough. We learned about who he was and about his paintings. Then we were shown his painting of "A Starry Night" and were told that we would be doing a painting like his. We had options to where we could choose a different setting to draw and we could add and change details if we wished. We were told to create smooth movements and to use our hands. We were given only the primary colors to work with and then white or black. We could add white and black to the primary colors if we wanted to. This was so much fun because I never got into finger painting when I was younger so it was fun to get to try it out.
Activity:
I think a fun activity to do with students is to have them choose an artist they like and then have them create their own version of their favorite painting by the artist. That way the students can share their art and favorite artist with the rest of the class. This also gives them opportunity and options to choose what picture and artist to choose from, but it does have to involve them finger painting their art work.

Starry Night Tissue Collage


Project Summary:
This project started by choosing different types of tissue paper and cutting the tissue paper into shapes that we thought we would use in this project. Then we placed the shapes we had cut onto a black sheet of construction paper. Once we found a spot where we wanted to put that piece of tissue paper, we glued the paper down. After we had everything glued, we went over the entire project with glue adhessive to help the tissue paper stay in place. The next step was to create the bottom part of the project, the landscape. Most of us chose to do a town scence with buildings. We were then to paste our landscape down at the bottom of the project. After this was completed, we were to use oil pastels on the picture to add color and shapes to our picture. I added stars and outlined the tissue paper to give it more of a bolder look.
Activity:
This activity I didn't like as much as the rest of them. An activity you could do with this project is to talk about stars and how they relate to the night sky. You could go more in depth on stars depending on the grade level.

Hidden Safari


Project Summary:
This lesson started off by the teacher asking us what kinds of animals we would see on a Safari. This grabs the student's attention and lets them know that the theme is a Safari. The teacher introduced warm and cool colors. We were going to use one of each to color over our animal. The first thing we did was create our "Ruby" red glasses because we would not be able to see our classmates animals if we didn't have our glasses on. The next thing we did was practice drawing animals. This gave us a chance to get our minds flowing and warm up. The next step was to choose the animal we were giong to draw, we had a few selections that the teacher passed out. The only thing that we didn't know was that we were going to draw the picture upside down. It was nice being able to have the picture of what we're drawing there for us, and to have options. Students love having options! The next step was disguising our animals so that we couldn't see the animal without our glasses. Then everyone in the class was able to present their drawings and the classmates had their glasses on to see if they could tell what animal that person drew.
Activity:
I think this would be really great to do with a science theme, like Under the Sea. They could draw a sea animal and disguise it and use their glasses to tell which animal the other students have drawn. I had never created or seen something like this done until doing it in class, so it was amazing to see how you could cover up the animals with cool and warm colors.

Eric Karl Collages


Project Summary:
We started this project by learning about Eric Karl and how he puts his picture books together. Than we were to create our own page out of a story book. We took white paper and added water to the paper, before adding the paint. This allowed the paint to spread and make smooth streaks across the paper. After we were done creating our pages, we let them dry and came back to make our story page use the pages of our collage. If others had left over pages we could use theirs as well. We could choose any character that we wanted for our story page. I chose to use a butterfly because I had a collage of brighter colors and butterflies are one of my favorite animals. We then had to add a line or two of writing to finish creating a page.
Activity:
This project would be great to use for almost any unit or project. The students could explore their creativity with creating any character for a story setting. I really enjoyed this project because it gave us opportunity and options. We were the artists and we could use and create whatever we wanted to. Students like to have options and like to be able to use their creativity.